SSH, Putty, and WinSCPThe Ultimate Guide to Remote Server Management
Tired of convoluted tutorials on remote server management? Let’s cut the fluff. This straightforward guide covers everything you need to know about SSH, Putty, and WinSCP—what they are, how they work, and how to make them work for you. It’s all the essential info and none of the unnecessary details.

Here's a quick rundown of the six parts of this guide:
- Understanding SSH, Putty, and WinSCP: What Are They?
- How Do SSH, Putty, and WinSCP Work Together?
- Configuring SSH
- Connecting to a Server with Putty
- Transferring Files Using WinSCP
- Optional: Security Tips
1. Understanding SSH, Putty and WinSCP: What Are they?
a. SSH: The Backbone of Secure Connections
🔒 Secure Shell (SSH) is the secure protocol that allows you to connect to remote servers and manage them safely. Think of it as the encrypted handshake that ensures your communication stays private. Most server providers include SSH access with their services.
How It Works: SSH creates a secure tunnel using public and private key encryption. This ensures everything you type is encrypted before it reaches the server.
With SSH, You Can:
- Manage servers remotely without compromising security.
- Execute powerful commands from anywhere.
- Transfer files with complete confidence.
Real-World Usage: Picture this: You’re at a coffee shop, sipping a latte, and you realize you need to restart a service on your web server. SSH lets you do that from your laptop without leaving your seat.
b. Putty: Your Command-Line Ninja
🖥️ Putty is the go-to tool for Windows users connecting to remote servers. It’s lightweight, versatile, and free. It also comes with PuttyGen, a sub-tool for generating SSH keys.
How It Works: Putty connects to your server via SSH, giving you access to its command-line interface. It’s like teleporting directly into your server’s terminal.
With Putty, You Can:
- Access your server’s command line effortlessly.
- Configure or debug server settings with precision.
- Connect using SSH, Telnet, or raw TCP protocols.
Real-World Usage: Your website’s database crashes at 2 AM. No worries—fire up Putty, log in to your server, and restart the service. Problem solved.
c. WinSCP: Your File Transfer Wingman
📂 WinSCP is a powerful tool for transferring files between your local machine and remote servers. For macOS users, similar tools like Cyberduck or FileZilla offer the same functionality.
How It Works: WinSCP uses SSH to securely transfer files. It’s essentially your server’s file manager, making file transfers a breeze.
With WinSCP, You Can:
- Use drag-and-drop functionality to transfer files easily.
- Edit files directly on the server.
- Transfer files securely with SFTP or SCP protocols.
Real-World Usage: You’ve updated your website’s code locally and need to deploy it. Simply drag the updated files from your desktop into the server’s folder with WinSCP. Done.
2. How Do SSH, Putty, and WinSCP Work Together?
These three tools are essential for seamless remote server management:
- SSH provides the secure foundation for server access.
- Putty lets you control your server directly via SSH.
- WinSCP handles secure file transfers with ease.
Together, they offer everything you need for efficient and secure server management.
3. Configuring SSH
As mentioned, most server providers offer SSH access by default. To connect, you’ll need to configure SSH by sharing your public key with the server. Some providers, like AWS, offer a key pair generation tool, which can be used to configure your server. While it’s a great option, the process of converting the generated keys for use with Putty can be tricky for beginners, and we prefer to keep things straightforward.
To make it easier, we’ll walk through the process of generating your own SSH key pair using PuttyGen, a tool included with Putty, and then configuring your server with it. This process is the same, no matter which provider you're using. Let’s break it down:
Putty and PuttyGen: Your Toolkit
Installing Putty
Download Putty from the official source: putty.org. Run the installer and follow the on-screen instructions to install it.
Steps to Generate and Use a Key Pair with PuttyGen
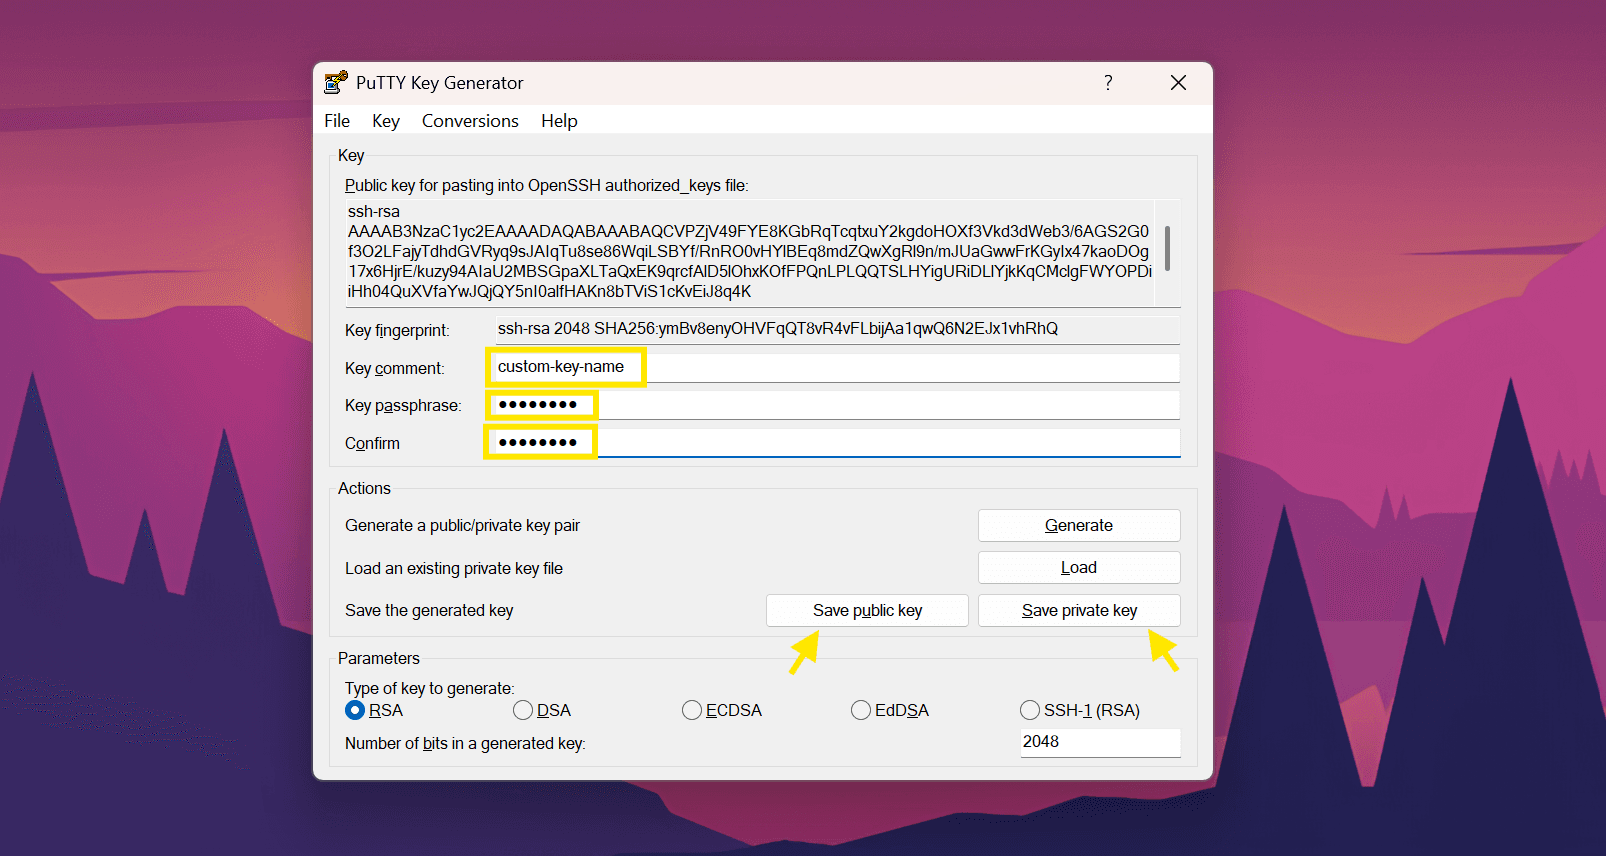
- Open PuttyGen: Launch the program (it's part of the Putty suite).
- Generate a New Key Pair: In the PuttyGen window, click Generate and move your mouse around the window to create randomness, which is essential for security.
- Configure Your Key: Add a descriptive label in the Key Comment field (e.g.,
MyServerKey) to identify the key. Use simple characters like hyphens or underscores. Optionally, add a passphrase for extra security, which protects your private key and requires the passphrase whenever you use it. - Save Your Keys: Save the private key securely by clicking Save private key. Copy the public key directly from the PuttyGen window.
- Add the Public Key to Your Server: Access your server and open the
~/.ssh/authorized_keysfile for the user account. Paste the public key (starting withssh-rsa) into the file on a single line.
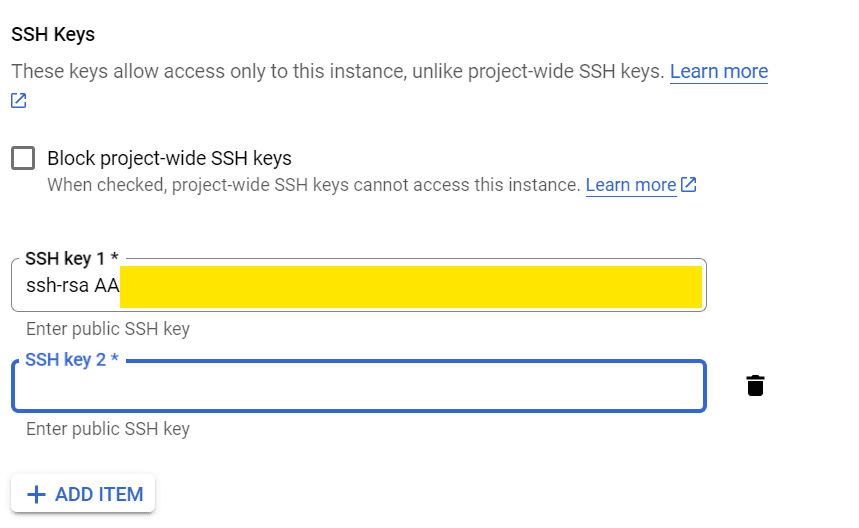
Example: Accessing SSH on Google Compute Engine for Public Key
- Log in to your Google Cloud Console.
- Navigate to the Compute Engine and locate your VM instance.
- Edit the VM instance and navigate to SSH section
- Add the copied public key to the VM’s metadata under the “SSH Keys” section.
And that’s it! You’re ready to connect. 🚀
4. Connecting to a Server with Putty
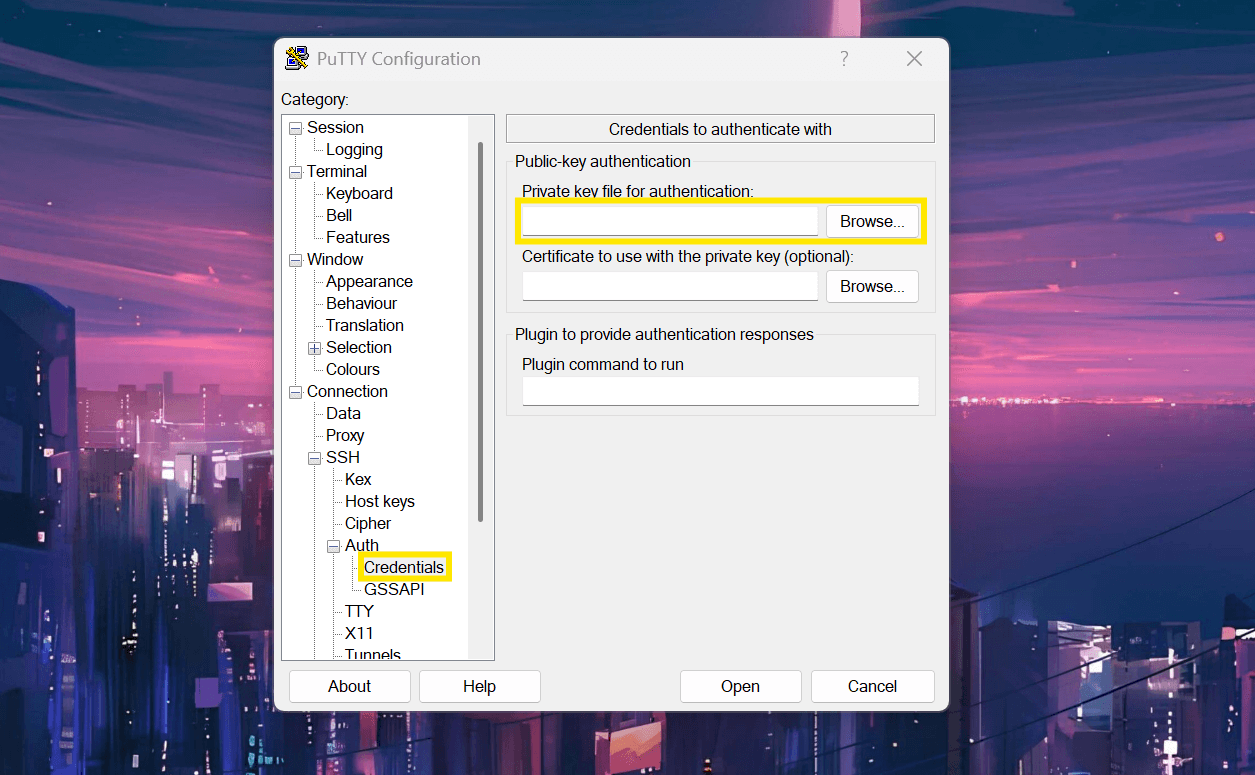
- Open Putty.
- Navigate to “Connection > SSH > Auth” and load your private key
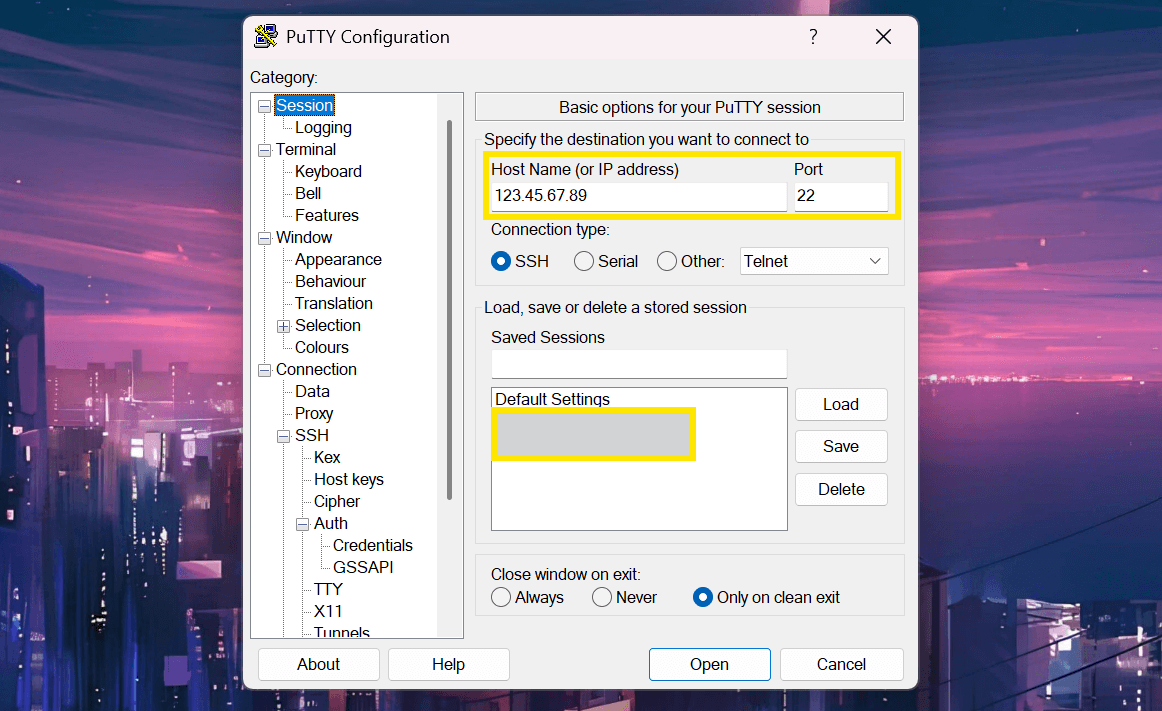
- Enter the IP address of your server in the “Host Name” field.
- Set the Port to 22 (the default for SSH).
- Optionally, save the session by going to “Session,” naming it, and clicking “Save.”
- Click “Open” to start the SSH connection. Enter your user login ID (the key comment you entered while generating the keys) when prompted.
What’s That Fingerprint Warning?
The first time you connect, Putty will ask you to confirm the server’s fingerprint. This is your server proving its identity. Click Yes if it matches your server’s details or click allow once if you wish to review it every time you login. Click No if you’re unsure or suspect foul play.
5. Transfering files using WinSCP
Connecting to Your Server
- Download WinSCP: winscp.net
- Enter your server’s IP address, username, and port (22 for SSH) and Import your private key if necessary.
- Import your private key if necessary. Alternatively, you can import saved Putty sessions by selecting Tools > Import Sites > Putty > "your_putty_session".
Moving Files
Once connected, drag and drop files between your computer and the server. Remember, files can only be transferred to the logged-in user’s folder (e.g., /home/username/).
For root-level transfers, use Putty to execute the following commands:
6. Security: Play It Smart
- Protect Your Keys: Never share your private keys, and rotate them regularly.
- Avoid Storing Passwords: Don’t save passwords in WinSCP, especially for production servers.
- Enable Passphrase Protection: Always use a passphrase for added security on your private key.
- Monitor Access Logs: Regularly check SSH login histories to detect any unauthorized access.
SSH via Putty and WinSCP is just the tip of the iceberg when it comes to server management and deployment. While alternatives like FileZilla offer cross-platform support, it’s best to stick with one tool for consistency and efficiency. With the right software in hand, we can simplify server management and focus on what really matters.